iOS Build UX SDK
The Planky Connect API Wrapper allows you build custom UX to connect bank accounts by using the Planky REST API.
- Xcode 10 or greater
- iOS 12.3 or greater
Clone and run the demo project from our GitHub repository.
You can select which environment you want to use the Planky SDK
| Environment | Description |
|---|---|
| sandbox | Use this environment to test your integration |
| production | Use this environment when deploying the live application |
These environments are listed in the SDK as below
1
2
Environment.sandbox
Environment.productionPlanky Connect is a framework distributed using CocoaPods dependency manager. If you are not familiar with this concept, please follow detailed instructions here.
To integrate, add PlankyConnectApi to your Podfile
1
pod 'FriendlyScoreConnectApi', '~> 0.2.0'then run following command in your project main directory:
1
pod installCocoaPods will install and embed all sources and dependencies into your app.
A user token can be created for the user using the customer_id. A customer_id is available after creating the user Create Customer
You must then use the customer_id to create user_token Create User Token
Choose the environment you want to integrate.
1
2
3
var  environment: Environment = Environment.sandbox

var fsClient: FriendlyScoreClient  = FriendlyScoreClient(environment: environment)
The fsClient will be required to make other requests
You can obtain the list of banks for the user.
In order to receive response you must implement closures requestSuccess, requestFailure, otherError.
Required parameters:
| userToken | User Token obtained from your server |
| requestSuccess | if the status code is between [200,300). Response type Array<UserBank> |
| requestFailure | if there was request failure, (status code = 401, 403, 500 etc..). Response type MoyaResponse |
| otherError | Any other error such as timeout or unexpected error. Response type Swift.Error? |
1
2
3
4
5
6
7
8
9
10
11
12
13
14
15
var userToken: String = "User Token obtained from your server"

fsClient?.fetchBankList(userToken: userToken,
         requestSuccess: { bankList in

         },
         requestFailure: { moyaresponse in
             let statusCode = moyaResponse.statusCode
             let data: Data = moyaResponse.data

         },
         otherError: { error in
             print(error.debugDescription)
         }
)
Find the important values for each bank that will be required for the UI and future requests. Below is an example of how to retrieve values for the first bank from the list.
1
2
3
4
5
6
7
8
9
10
11
12
13
14
15
16
17
18
19
20
21
22
23
//Showing the important variables for the first bank
var selectedBank: UserBank = self.bankList![0]

//Slug of the bank. Will be required for other end points
var bankSlug: String = selectedBank.bank.slug

//If the user has connected accounts from this bank
var connected: Bool? = selectedBank.connected!

//The flag when true indicates the bank APIs are available
var isActive: Bool? = selectedBank.bank.is_active

//Url for the logo of the selected bank
var bankLogoUrl: URL? = selectedBank.bank.logo

//Max number of months in the past to access data
var maxMonthsInPast: Int = (selectedBank.bank.bank_configuration?.transactions_consent_from!)!

//Max number of months in the future to access data
var maxMonthsInFuture: Int = (selectedBank.bank.bank_configuration?.transactions_consent_to!)!

//Accounts for the user, if the user has connected the account
var  bankAccountList: Array<BankAccount> = bankList[0].accounts;
The bankSlug value in the code block above is used across all the endpoints to build the rest of the user journey.
The maxMonthsInPast and maxMonthsInFuture variables in the block above are the maximum number of months in past and future for which account information can be accessed. You must use these values to calculate timestamps for future requests.
Once the user has selected a bank from the list you must show the user the necessary information, as required by the law.
In order to receive response you must implement closures requestSuccess, requestFailure, otherError.
Required parameters:
| userToken | User Token obtained from your server |
| bankSlug | Slug for the bank user has selected from the list of banks. |
| transactionFromTimeStampInSec | Time stamp in seconds. Set to null to use default. |
| transactionToTimeStampInSec | Time stamp in seconds. Set to null to use default. |
| requestSuccess | if the status code is between [200,300). Response type ConsentScreenInformation |
| requestFailure | if there was request failure, (status code = 401, 403, 500 etc..). Response type MoyaResponse |
| otherError | Any other error such as timeout or unexpected error. Response type Swift.Error? |
1
2
3
4
5
6
7
8
9
10
11
12
var userToken: String = "User Token obtained from your server"
fsClient?.fetchConsentScreenInformation(userToken: userToken, slug: selectedBank.bank.slug, transactionFromTimeStampInSec: dateFrom, transactionToTimeStampInSec: dateTo, requestSuccess: { consentScreenInfo in
     print(consentScreenInfo.metadata?.terms_and_condition_url)
     print(consentScreenInfo.consents)
         }, requestFailure: { failureResponse in
             let statusCode: Int = failureResponse.statusCode
             let responseData: Data = failureResponse.data


         }, otherError: { error in
             print(error.debugDescription)
})
The ConsentScreenInformation includes 2 objects: metadata and consents.
You can use information in metadata to build your custom consent information text. The consents object provides ready-to-use text to build the consent screen.
Make this request from the consent screen after the user has seen all the information that will is being requested.
You must make this request to get the url to open the Bank Flow for users to authorize access account information.
In order to receive response you must implement closures requestSuccess, requestFailure, otherError.
Required parameters:
| userToken | User Token obtained from your server |
| bankSlug | Slug for the bank user has selected from the list of banks |
| transactionFromTimeStampInSec | Time stamp in seconds. Use the same value as used in the Consent screen endpoint. Set to null to use default |
| transactionToTimeStampInSec | Time stamp in seconds. Use the same value as used in the Consent screen endpoint. Set to null to use default. |
| redirectUri | This must be the scheme you are using to bring the user back to your app. It must be the same as set in the Planky developer console. For details on setting the app for redirection see section 7. |
| requestSuccess | if the status code is between [200,300). Response type BankFlowUrl |
| requestFailure | if there was request failure, (status code = 401, 403, 500 etc..). Response type MoyaResponse |
| otherError | Any other error such as timeout or unexpected error. Response type Swift.Error? |
1
2
3
4
5
6
7
8
9
10
11
12
13
//Redirect Uri you have set in the Planky developer console.
let redirectUriValue: String = "YOUR_APP_REDIRECT_SCHEME"

fsClient?.fetchBankFlowUrl(userToken: userToken, slug: bankSlug, transactionFromTimeStampInSec: dateFrom, transactionToTimeStampInSec: dateTo, redirectUri: redirectUriValue, requestSuccess: { bankFlowUrl in
             print( bankFlowUrl.url)
         }, requestFailure: { failureResponse in
             let statusCode: Int = failureResponse.statusCode
             let responseData: Data = failureResponse.data


         }, otherError: { error in
             print(error.debugDescription)
         })
From BankFlowUrl extract the url value and trigger it to start the authorization process with the bank.
The user is redirected back to your app after a user successfully authorizes, cancels the authorization process or any other error during the authorization.
Your app must handle redirection for:
| /openbanking/code | successful authorization by user. It should have parameters bank_slug |
| /openbanking/error | error in authorization or user did not complete authorization. It should have 2 parameters: bank_slug and error |
In order to handle redirection properly, listen to url in the function application(_:open:options:):
1
2
3
4
5
6
7
func application(
  _ app: UIApplication,
  open url: URL,
  options: [UIApplicationOpenURLOptionsKey: Any] = [:]) -> Bool {
    //Extract url parameters
    return true
}Go to the Redirects section of the Planky developer console and provide your Bundle Identifier.
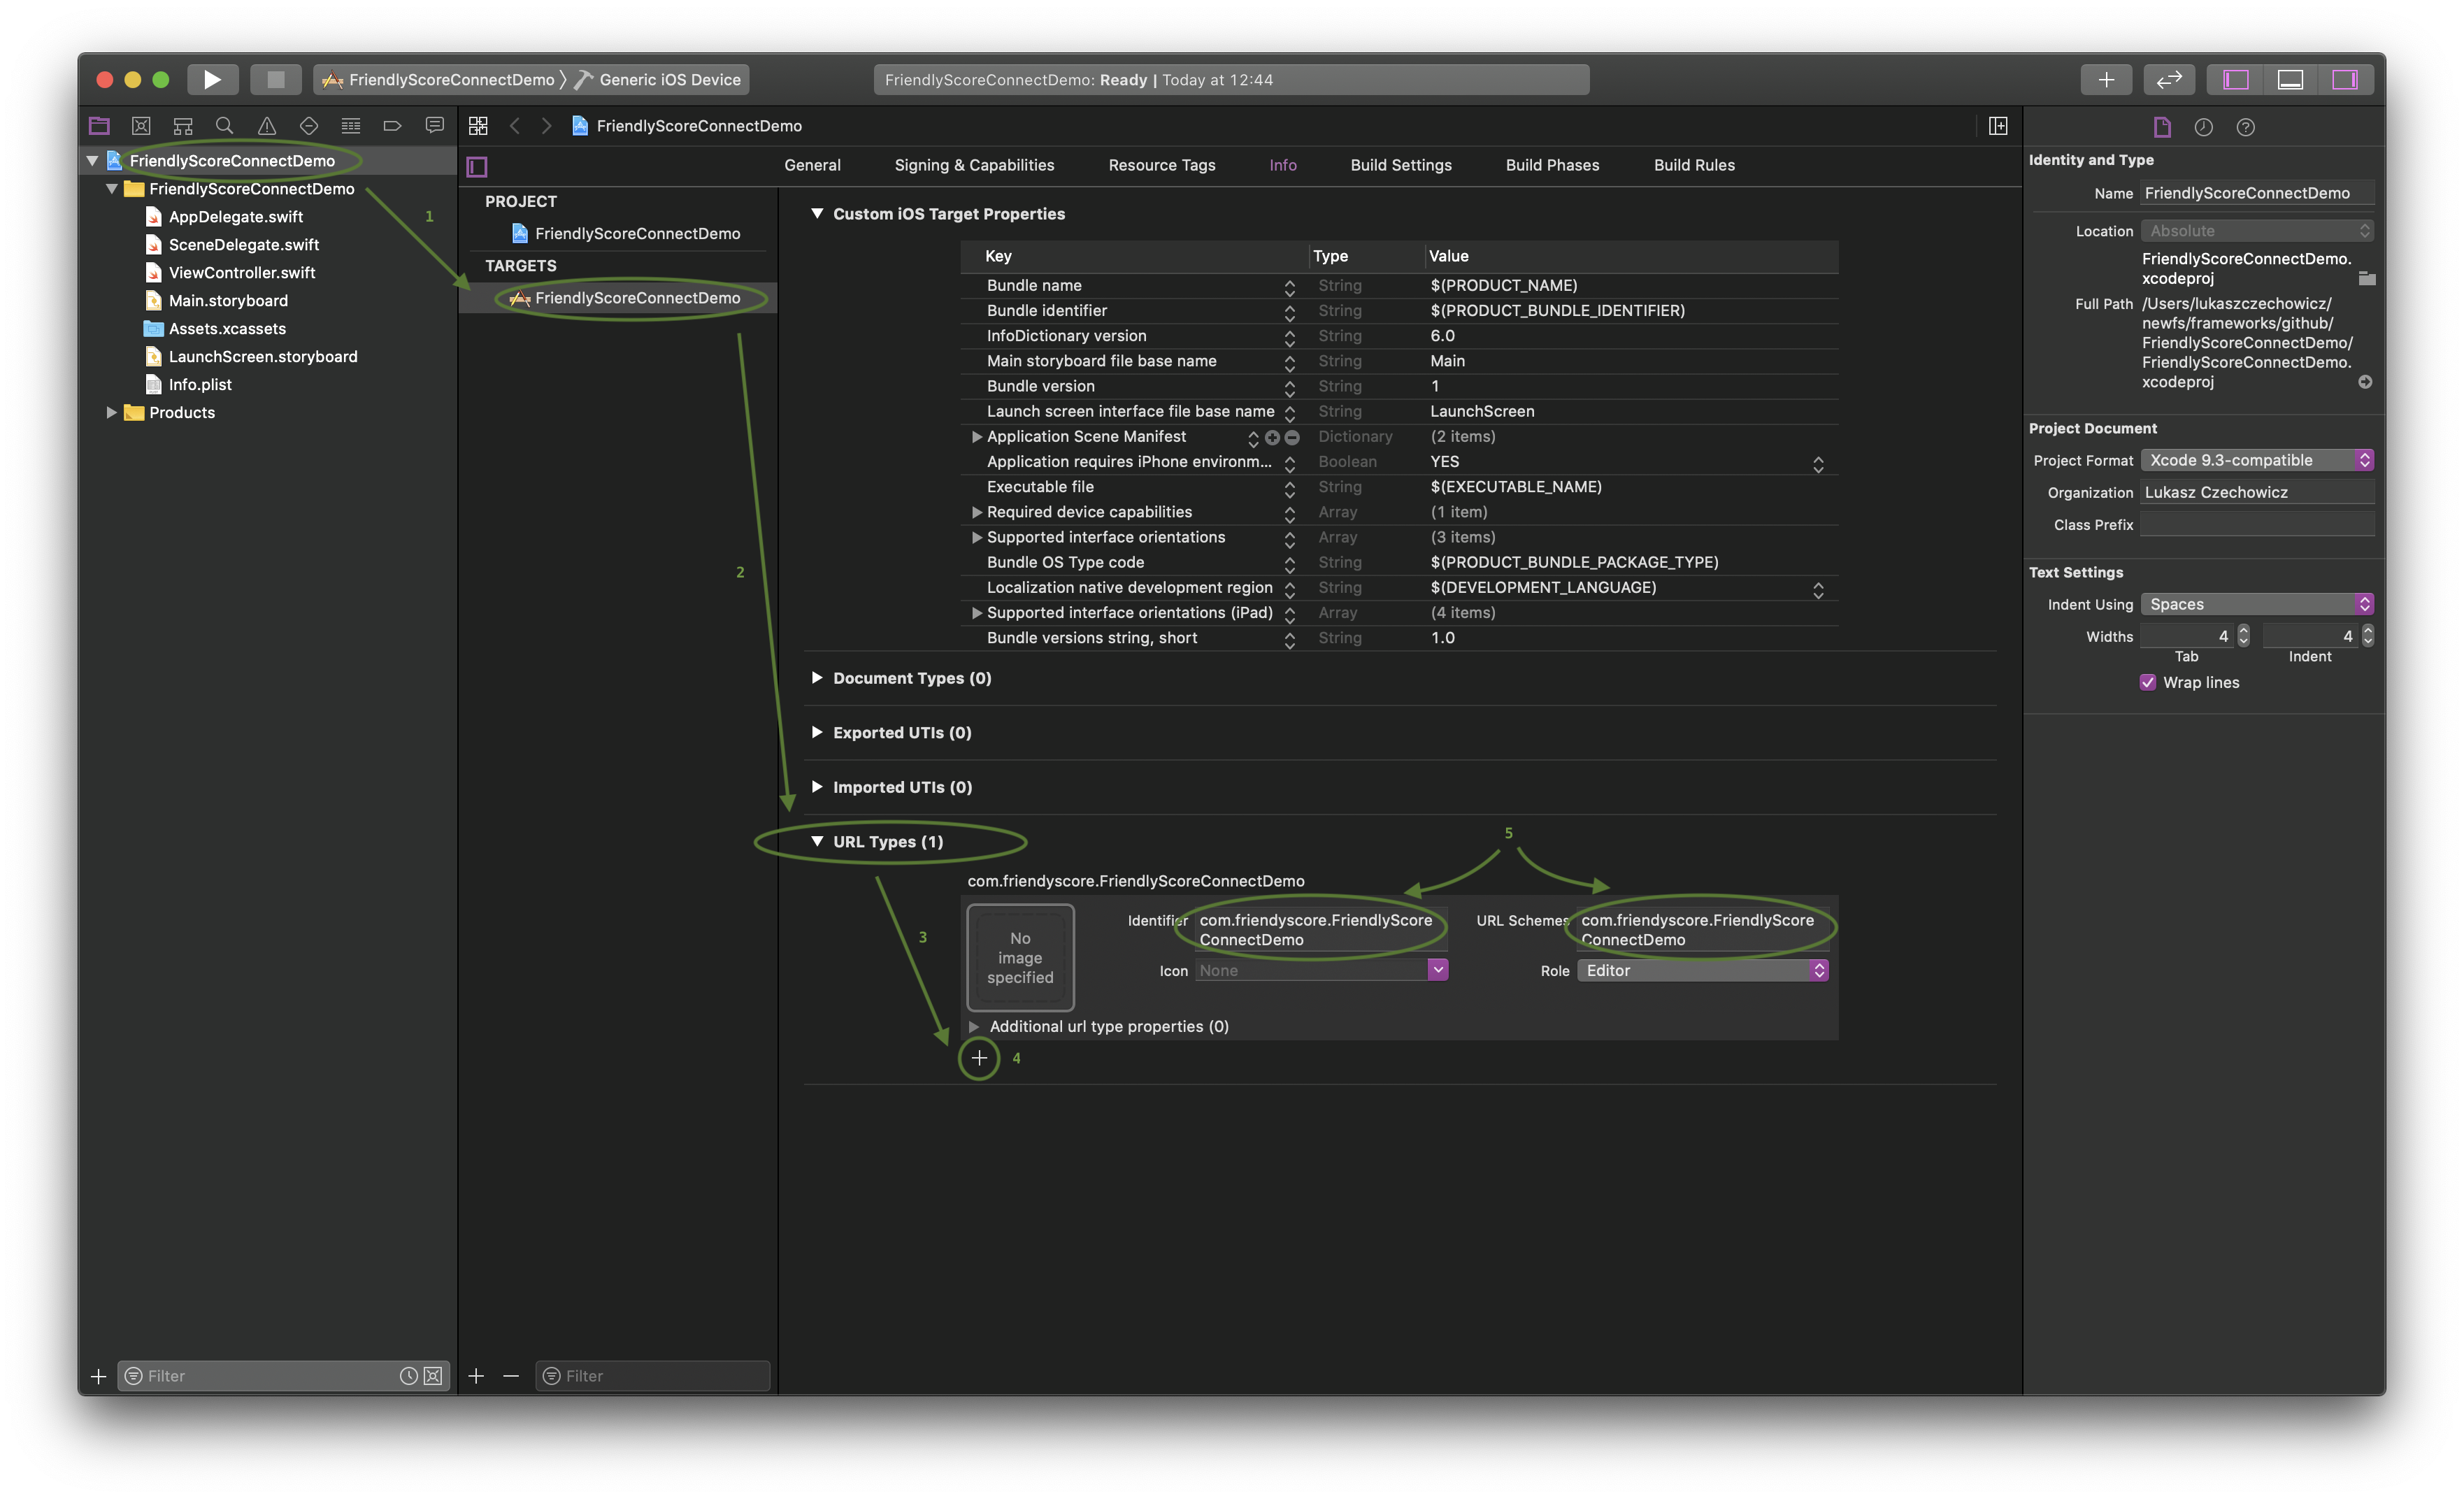
Navigate to your app target, create new URL Types object and add your bundle identifier to Identifier and URL Schemes field, as below:

Make this request to allow the user to delete consent to access account information.
In order to receive response you must implement closures requestSuccess, requestFailure, otherError.
Required parameters:
| userToken | User Token obtained from your server |
| bankSlug | Slug for the bank |
| requestSuccess | if the status code is between [200,300). Response type Void |
| requestFailure | if there was request failure, (status code = 401, 403, 500 etc..). Response type MoyaResponse |
| otherError | Any other error such as timeout or unexpected error. Response type Swift.Error? |
1
2
3
4
5
6
7
8
9
10
11
12
13
14
var userToken: String = "User Token obtained from your server"
 fsClient?.deleteBankConsent(userToken: userToken, slug: bankSlug,
         requestSuccess: { _ in

         },
         requestFailure: { moyaresponse in
             let statusCode = moyaResponse.statusCode
             let data: Data = moyaResponse.data

         },
         otherError: { error in
             print(error.debugDescription)
         }
 )
Was this article helpful?
Friendly Score UK Ltd.
84 Brook Street
London W1K 5EH
Call us on +44 20 3709 6726
Company registered in England
Company number 09168668, ICO ZA111687
VAT registration number 206 9758 80
Authorised and Regulated by the Financial Conduct Authority. (FRN: 821100, 781963)